
Flowers have a way of making everything feel a little more special. But what if you could make a bouquet that stays beautiful for years? That’s where crochet flowers come in! Soft, colourful and full of personality, these handmade blooms are a lovely alternative to fresh flowers.
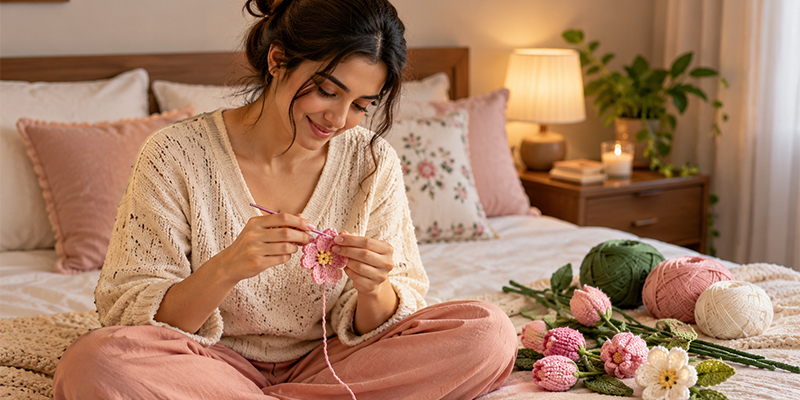
The best part? You don’t need to be a crochet expert to make them. With some yarn, a crochet hook, and a little patience, you can create a beautiful bouquet. This beginner-friendly guide will walk you through the process. So, keep reading!
Table of Contents
What Are Crochet Flowers?
Crochet flowers are handmade floral designs created by looping yarn together with a crochet hook. Using different stitches, colours and patterns, you can recreate the look of roses, daisies, tulips, sunflowers and many other blooms. Unlike fresh flowers, crocheted blooms don’t need watering or sunlight. With proper care, they can keep their shape and colour for years.
Materials You’ll Need
Before you begin making your crochet flowers, gather the following supplies:
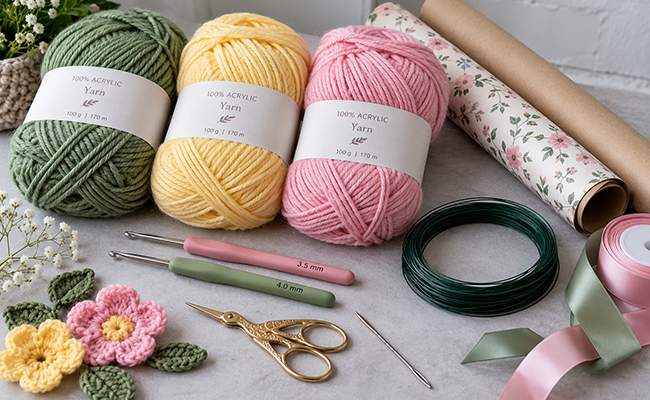
- Yarn: Cotton or acrylic yarn in your favourite flower colours, along with green yarn for leaves.
- Crochet hook: A 3.5 mm or 4 mm hook works well with many DK-weight yarns. Check your yarn label for guidance.
- Scissors: For cutting yarn neatly.
- Tapestry needle: A blunt needle for sewing pieces together and hiding loose ends.
- Floral wire or wooden stems: To support your flowers.
- Green floral tape: To wrap stems and secure the flowers.
- Craft glue: Optional, for reinforcing attachments.
- Wrapping paper: Kraft paper, tissue paper or floral wrapping sheets.
- Ribbon: For tying your finished bouquet.
Beginner’s tip: Start with smooth, light-coloured yarn. It’s much easier to see individual stitches than it is with fluffy or dark yarn.
Basic Crochet Stitches You Should Know
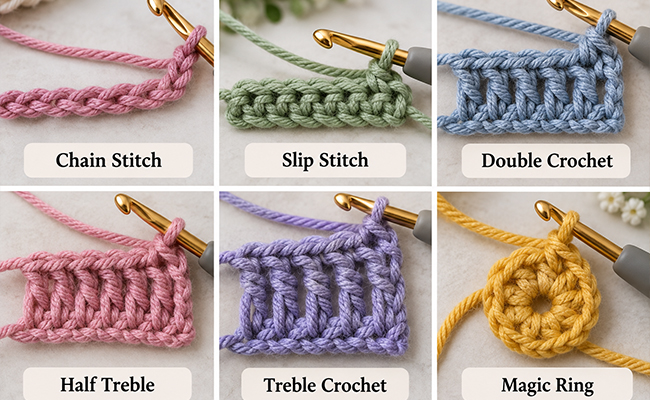
You don’t need to master dozens of techniques to make beautiful crochet flowers. A few basic stitches will get you started.
- Chain stitch (ch): Creates the foundation for your crochet work.
- Slip stitch (ss): Joins stitches and helps finish rounds neatly.
- Double crochet (dc): Creates short, firm stitches.
- Half treble (htr): Adds moderate height and gentle curves.
- Treble crochet (tr): Creates taller stitches, perfect for petals.
- Magic ring: Forms an adjustable circular centre for flowers.
Important: This guide uses UK crochet terminology. UK double crochet is called single crochet in US patterns, while UK treble crochet is called double crochet in US patterns.
Practise these stitches with spare yarn before starting your bouquet. Once you feel comfortable, you’re ready to make your first flower.
Step-by-Step Instructions for the Bouquet
Ready to turn a few balls of yarn into a handmade bouquet? Follow these simple steps to create your own arrangement of crochet flowers.
Step 1: Choose Your Flower Design and Colours
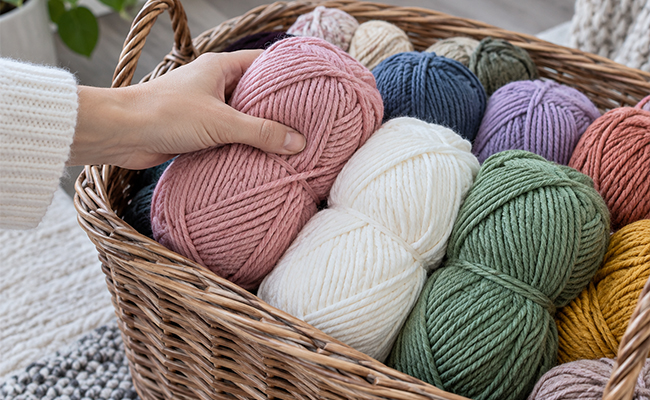
Start by deciding what kind of bouquet you’d like to create.
For beginners, daisies and simple five-petal flowers are excellent choices because they use repetitive stitches and don’t require complicated shaping.
You can try combinations such as:
- Pink and white for a soft, romantic bouquet.
- Yellow and orange for a cheerful, sunflower-inspired arrangement.
- Lavender, cream and pastel blue for a calming colour palette.
- Red and pink for a Valentine’s Day gift.
- Peach, ivory and sage green for an elegant decorative bouquet.
For your first attempt, aim for five to seven flowers. This gives you enough blooms for a lovely arrangement without making the project feel overwhelming.
Step 2: Create the Centre of Your First Flower
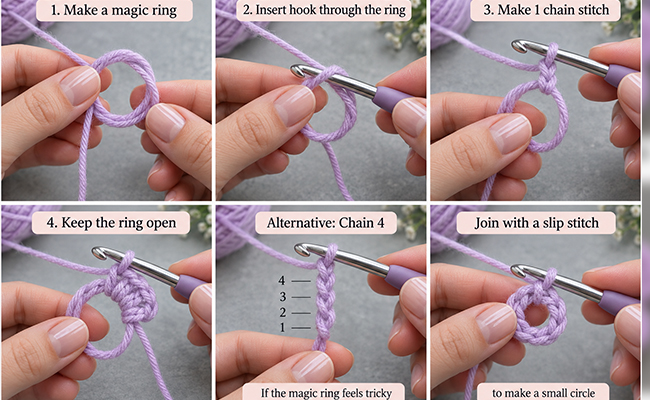
Let’s begin with a simple five-petal flower.
- Take your chosen yarn and make a magic ring.
- Insert your crochet hook through the ring.
- Make one chain stitch to secure your working yarn.
- Keep the ring open while you begin crocheting your petals.
If the magic ring seems tricky, chain four stitches and join the first and last with a slip stitch to create a small circular foundation.
This little ring will become the centre of your flower.
Step 3: Crochet the Flower Petals
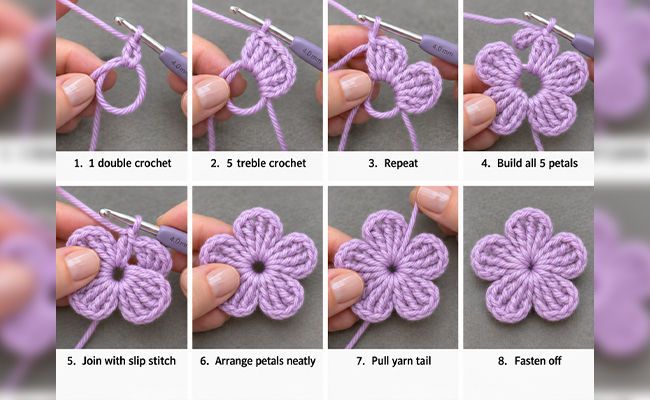
Now comes the fun part: creating the petals!
For a simple five-petal flower, follow this pattern using UK crochet terms.
- Work one double crochet into your magic ring.
- Make five treble crochet stitches into the same ring.
- Repeat this sequence of one double crochet followed by five treble stitches four more times.
- You should now have five rounded petals.
- Arrange the petals so they sit neatly around the centre.
- Gently pull the yarn tail to tighten the magic ring.
- Join with a slip stitch into your first double crochet and fasten off.
You now have your first handmade flower!
Repeat this process using different colours. As you become more confident, experiment with yarn thickness and hook sizes to create crochet flowers with different petal shapes and textures.
Step 4: Add a Decorative Flower Centre
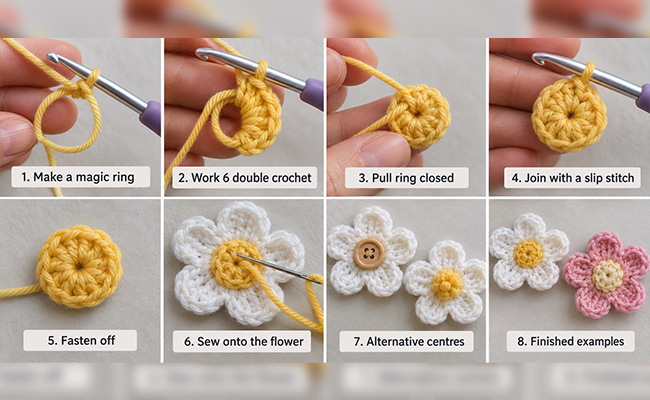
A contrasting centre can make your flower look more defined.
Try making a small yellow crochet circle using a magic ring and six double crochet stitches. Pull the ring closed, join with a slip stitch and fasten off.
Sew the little circle onto the front of your flower using a tapestry needle.
You can also use a small button or a stitched yarn knot to decorate the centre.
For a classic daisy look, pair white petals with a yellow centre. If you’re making pink crochet flowers, cream or golden-yellow centres can create a lovely contrast.
Step 5: Make Green Crochet Leaves
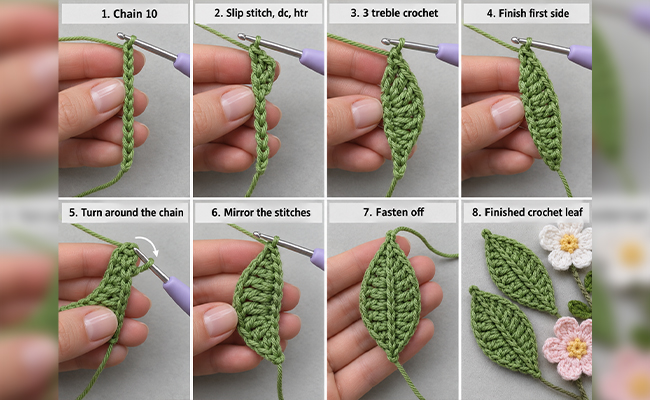
Every bouquet needs a little greenery!
Leaves give your crochet flowers a more natural appearance while filling the spaces between individual blooms.
Here’s a simple leaf pattern:
- Take green yarn and create a foundation chain of ten stitches.
- Starting in the second chain from the hook, work a slip stitch.
- Make one double crochet, followed by one half treble.
- Work three treble crochet stitches, one in each of the next three chains.
- Add one half treble, one double crochet and one slip stitch in the remaining chains.
- Turn the work and crochet along the opposite side of the foundation chain, mirroring the stitch sequence.
- Fasten off, leaving a yarn tail to attach the leaf.
Your leaf should have a gentle, elongated shape.
Make around five to eight leaves for a small bouquet. Experiment with different shades of green to make the arrangement more interesting.
Step 6: Attach the Flowers to Stems
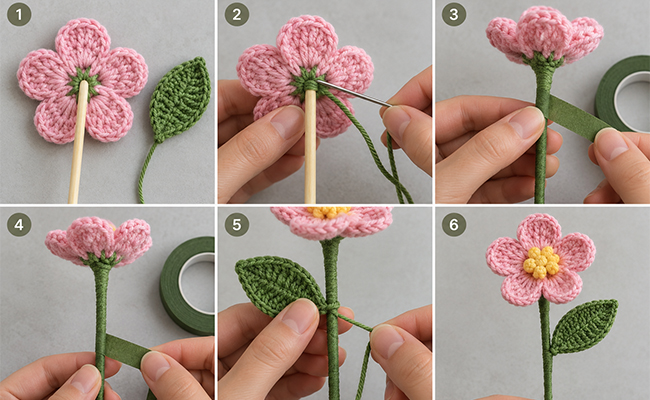
Once your blooms and leaves are ready, it’s time to give them stems.
Use wooden skewers or sturdy floral wire, depending on how flexible you want your arrangement to be.
Here’s how:
- Position the top of a wooden stem or prepared floral wire against the back of your flower.
- Use green yarn and your tapestry needle to secure the flower firmly around the attachment point.
- Wrap green floral tape around the upper part of the stem to reinforce it.
- Continue wrapping downwards until the stem is covered.
- Attach a crochet leaf to the stem using its yarn tail, then cover the attachment with floral tape.
If you’re using floral wire, bend the end into a small loop and secure it behind the flower. Make sure no sharp ends remain exposed.
Repeat this process for every bloom.
Step 7: Arrange Your Crochet Flower Bouquet
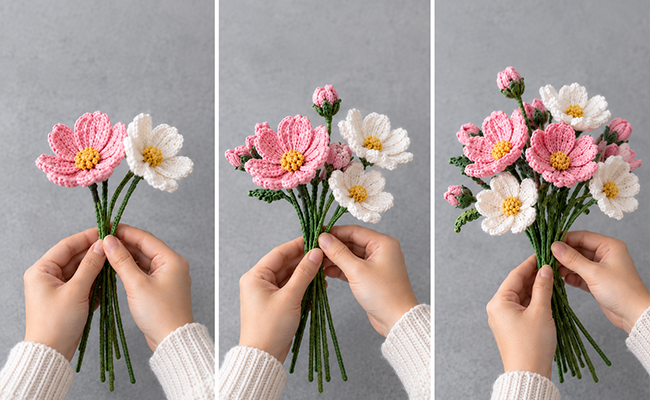
Now that all your crochet flowers have stems, you can finally bring your bouquet together.
Begin by placing one or two flowers in the centre. These will act as the focal point of your arrangement.
Next, position the remaining flowers around them. Alternate the colours and slightly vary the height of the stems to create a fuller appearance.
Tuck your crocheted leaves between the flowers to cover visible gaps.
Take a moment to view your bouquet from different angles. Adjust the stems until the arrangement looks balanced.
There’s no need to make every flower sit at exactly the same height. A little variation often makes handmade bouquets look more natural.
Step 8: Wrap and Decorate Your Bouquet
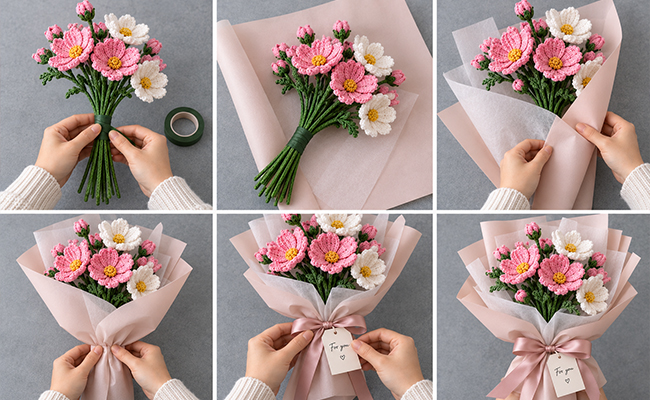
A beautiful wrapping style can make your handmade bouquet feel like a gift from a boutique.
Start by gathering the stems and securing them with floral tape or a ribbon.
Place your crochet flowers diagonally across a sheet of wrapping paper, keeping the blooms visible above the paper’s edge.
Fold the sides around the stems and secure the wrapping at the base.
For the finishing touch, tie a satin ribbon or a piece of twine around the bouquet.
You can also add a handwritten note, a small gift tag or a personalised message.
And there you have it! Your very own DIY crochet flower bouquet is ready.
Common Mistakes to Avoid When Making Crochet Flowers
Even a simple crochet project can become frustrating when a few things go wrong. Here are some common mistakes and how to avoid them.
- Using the Wrong Hook Size: A hook that’s too large can leave gaps between stitches, while one that’s too small can make crocheting difficult. Start with the size recommended for your yarn and adjust if the finished fabric feels too loose or stiff.
- Pulling the Yarn Too Tightly: Tight stitches can make petals curl more than intended. Try maintaining even yarn tension throughout the project. Your stitches should feel secure but still easy to work into.
- Forgetting to Count Stitches: Missing a stitch can change the shape of your petals or leaves. Count your stitches as you complete each section, especially when working on your first few flowers.
- Not Securing the Stems Properly: Loose stems can cause your flowers to tilt or detach. Make sure each flower is firmly attached before adding leaves or wrapping the bouquet.
- Rushing the Final Arrangement: Even beautifully made flowers can look uneven if they’re placed too close together. Spend a few extra minutes adjusting the height and position of each bloom before securing the bouquet.
Some Frequently Asked Questions
Can beginners make crochet flower bouquets?
Absolutely! Beginners can start with basic five-petal crochet flowers and gradually try more detailed patterns.
Which yarn is best for crochet flowers?
Cotton yarn is a popular choice because it provides a good stitch definition and helps petals hold their shape. Acrylic yarn is another affordable and widely available option.
How long does it take to make a crochet flower bouquet?
The time depends on your experience and the complexity of your designs. A simple flower may take around 15 to 30 minutes once you’re familiar with the pattern. A complete beginner’s bouquet may take several hours across multiple sessions.
Can I make crochet flowers without floral wire?
Yes. Wooden skewers or thin craft sticks can work well as stems.
Making a DIY crochet flower bouquet is about enjoying the process as much as the finished result. Your first petals might look a little uneven, and your stems may need a few adjustments. That’s part of learning something new. So, be patient, and the outcome will not disappoint you. Even if the bouquet has a few imperfections, the recipient will surely be in awe of your hard work. So, definitely try your hand at this!
